
Data Acquisition Using WINDAQ/200
Throughout the semester you will recording various types of data, e.g., blood pressure (BP), the force of muscle contractions, electrocardiograms (ECG), etc. To accomplish these tasks, you will utilize various transducers that convert the mechanical forces involved in BP or contraction or the electrical signals from an ECG into a voltage signal that enters the computer. The recorded data is saved on the computer as a file which may be replayed and analyzed. Thus several things must be taken into consideration before you begin to accumulate data. In any event, please bring a 3.5" high density diskette to each laboratory so you may make a copies of your data files for future reference. The diskettes will be formatted in the laboratory before use.
Introduction: Recording Parameters
Starting WINDAQ: From Windows, go to the Program Manager window and select the WINDAQ/200 icon. Once the program is running, you may use the familiar Windows arrows to maximize/minimize the open window. You may also click and drag within the title bar to position the window any place on the screen. Clicking and dragging an edge or corner also expands or shrinks the size of the window.
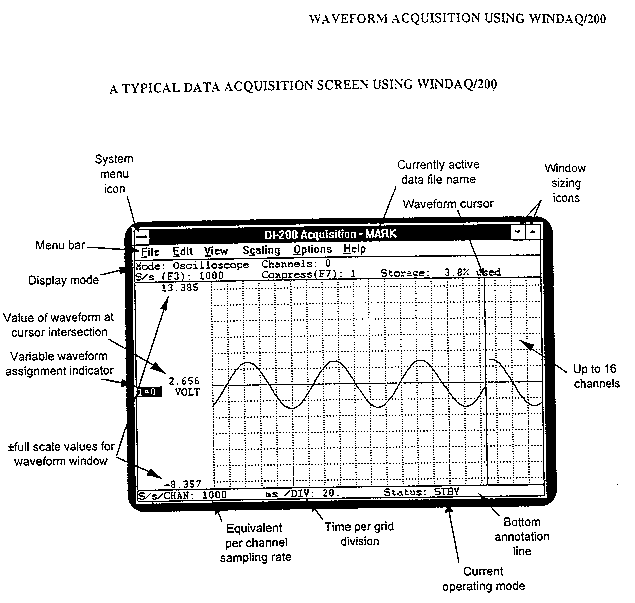
Status and Annotation Bars: The Status bar at the top of the screen (below the menu choices) displays the settings of all current data acquisition parameters and what % of the data file is filled. Double clicking the MODE field toggles between the scroll and oscilloscope modes. Double click the CHANNELS and COMPRESSION fields and examine the results.
The bottom STATUS bar indicates the equivalent per channel sampling rate (sampling rate divided by the # of channels), the time per grid division, and the operating mode (SET - UP, RECORD, STD BY).
The Left or Right annotation bars indicate the value of the trace (if the cursor is on, it = the value at the cursor; if it is off, it = the value at right edge of screen), the + full scale values of the channels as traced, and the channels being used.
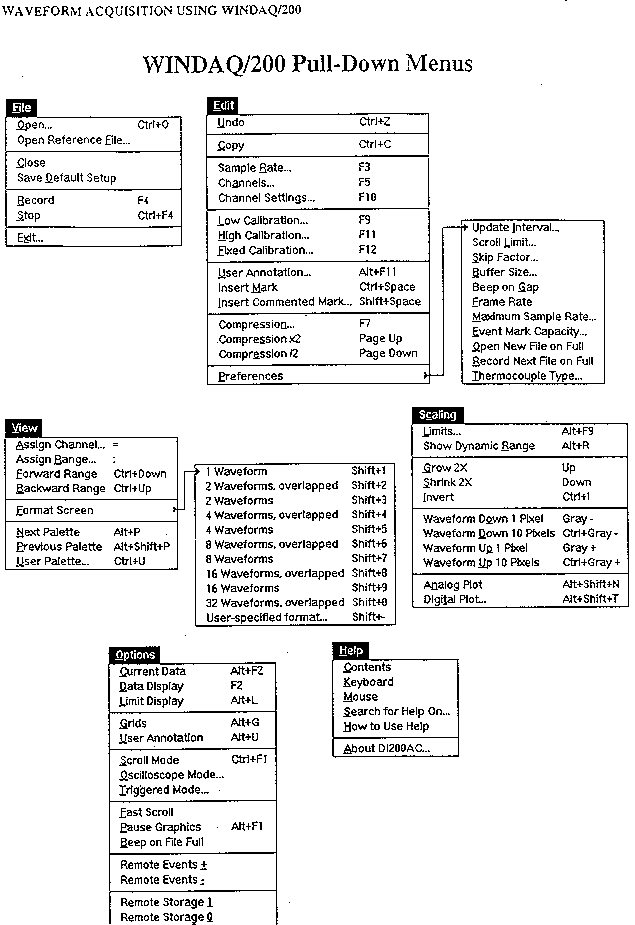
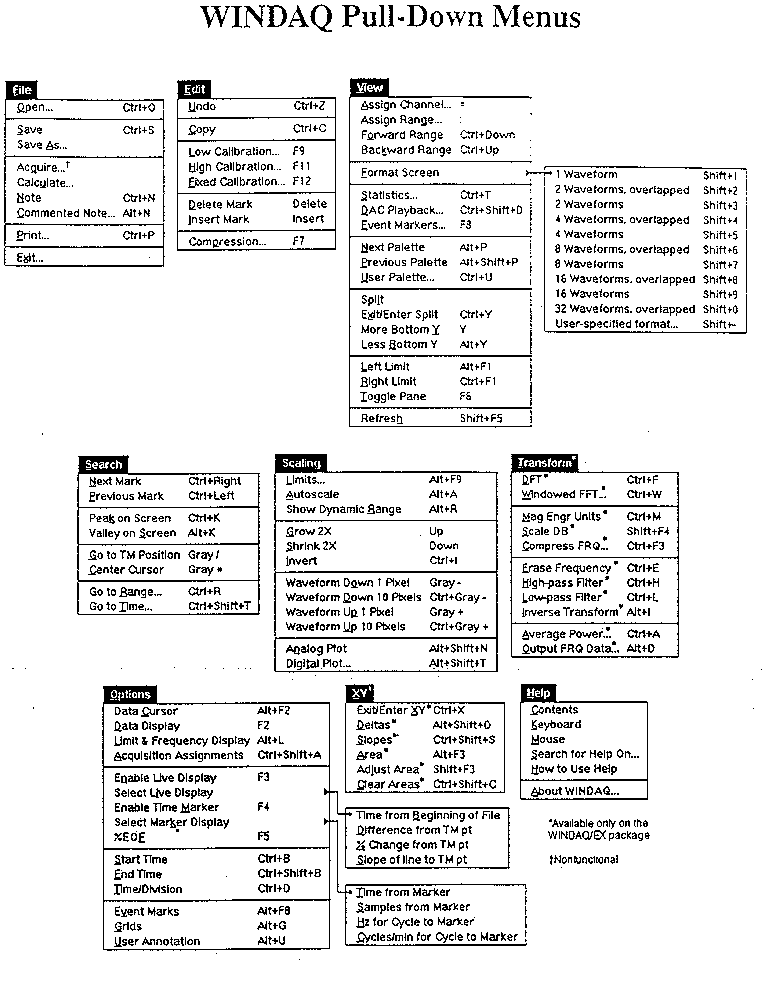
A full list of the menu functions is given on the next two pages. Relax!!! You will not be expected to remember more than two or three of the listed settings. In fact, you will only use a total of six or seven of them during any given experiment.
Number of Channels: In the ZOOL 423 experiments, you will first determine how many signals to record. The WINDAQ program can record up to 16 different signals at once. Mercifully, you will only need to record a maximum of 4! Your first decision is how many to channels or signals will be required. Thus you will place the required number of data channels or traces on the screen when you begin (see below). For our purposes, this will = 1, 2, or 4.
Sampling Rate: Next you must decide how many data points or samples per second you want to record. Each sample takes up computer disk space, so the trick is to utilize a sampling rate that is high enough to give an accurate representation of the data without using up the disk space too rapidly. For example, the activity of a slowly contracting section of ileum muscle can be recorded accurately at 10 samples/sec while an ECG may require 100 samples/sec. In the previous example, the ECG will fill up the data file 10 times faster than the muscle contractions. You will be instructed as to the correct sampling rate to choose in each experiment.


Channel Scale: The transducer converts each type of data signal to a voltage. Depending upon the amplitude of the signal and the gain or amplification of the recording equipment, you must fit the recorded data trace into the screen. To do this, you will select a channel scale or range. This may vary from mV to + 5 volts. There is no real trick to this; you simply look at the data and change the scale to accommodate the full range of data signal, i.e., be sure it all fits on the screen.
Data Files: All data will be recorded onto the computer's hard drive. You may then copy it onto your own diskette as a backup. You must give your data file a name that both tells you what is in the file and allows you to find it among the hundreds of other files from other investigators. Your TA will give you directions for naming the files.
An Important Consideration: All of the above items must be specified before you begin to record data. Once you start, you will not be able to change some of the above unless you specify a new data file, change the settings, and start recording again.
Running WINDAQ: A Fast Start Introduction
WINDAQ runs in Windows 95. Go to the program manager and, using the left mouse button, double click the WINDAQ/200 icon. Alternately, your TA may give you a specific WINDAQ file to open. This file will have the variables discussed above already set. Be sure to write them down into your lab manual.
When the program begins:
1. Choose # of channels... from the Edit menu at the top of the screen. The possibilities are listed in TABLE 1. Note that you may also use the ALT + # key combinations (simultaneously press both keys at once) to do the same thing. For a first experiment, select format 1, one full screen window. Feel free to try others and see what the trace looks like.
2. Choose a sampling rate...from the Edit menu specify how fast to sample the signal (samples/sec). For the first exercise select 10/sec.
3. Choose Open...from the File menu and assign a file name. Your TA will give you the details on this operation. Please use only approved file names and disk directories or your data may be lost in the maze of thousands of files! In most exercises, your TA will have preset files to open and use. Thus most of these parameters will already be determined for you.
4. Examine the signal. Look at the data coming across the screen. As the amplitude changes, is all of the trace contained in the window? If not, you must either move the data into the window and/or decrease the gain on the amplifier or the channel scale. First, use the left mouse button (click and hold) to drag a rectangle through any part of the data that is in the window (on the screen). Release the mouse button and the rectangle remains on the screen. Place the cursor or arrow on the screen within the rectangle, hold down the left mouse button and drag the rectangle into the center of the data window. When you release the mouse button, the data magically repositions itself inside the rectangle in the center of your window!
5. Choose Record... from the File menu to start acquiring the data on the disk. A simpler way to start the recording procedure is to hit the F4 key. To stop recording, again select Stop from the File menu at the top of the screen or simultaneously hit the CTRL + F4 keys. Don't let the record function run if you don't need the data! If you do, your file will fill up with useless data in a big hurry.
Recording Various Signals
You first try at using this program will involved recording a simple voltage signal generated by a stimulator. Connect the stimulator to the input box and set the stimulator controls to the following:
voltage = 0.1 volts
frequency = 2 pulses/sec
duration = 100 msec
and begin delivering repeated stimuli.
Look at the data on the screen and position the signal. Before you begin recording, set all WINDAQ parameters so that you can accurately record the signal. Please select a sampling rate that is high enough to accurately capture the signal but does not use up file space at too rapidly. Name this file according to the instructions given by the TA.
Once you have recorded a minute or so of this data, stop recording and exit the program. Now use the WINDAQ icon to run the playback program. When prompted, select the file you just recorded and replay it. Spend some time with the options so that you are able to change the time and voltage scales.
Next open a prerecorded BP file as instructed by the TA. Note the various recording parameters selected by the experimenter.
The menu choices and a sample screen for the WINDAQ playback program are given on the last two pages of this exercise.
